

SSO Integration Guide for Mammouth AI Business customers (per-IdP setup instructions)
This document is for IT administrators of organizations that want to enable Single Sign-On (SSO) for their users on mammouth.ai.
To share any sensitive information, use privatebin.mammouth.ai for an encrypted, secure way to share data and send it to [email protected].
Microsoft Entra ID (formerly Azure AD)
1. Register an application
- Sign in to the Azure portal with an account that can register applications.
- Go to Microsoft Entra ID → App registrations → New registration.
- Fill in:
- Name:
Mammouth AI SSO(or any name you prefer) - Supported account types:
Single tenant only - Redirect URI: Select Web and enter, the alias being a lowercase string without spaces that uniquely identifies your organization (simply respect your DNS, example
google-com):https://sso.mammouth.ai/realms/mammouth/broker/<alias>/endpoint
- Name:
- Click Register.
2. Note Tenant ID and Client ID
On the app's Overview page, copy:
- Application (client) ID → share this as Client ID
- Directory (tenant) ID → share this as Entra Tenant ID
3. Grant API permissions
- Go to API permissions → Add a permission → Microsoft Graph → Delegated permissions.
- Add:
openid,profile,email. - Click Add permissions and confirm.
4. Create a Client secret
Go to Certificates & secrets → Client secrets → New client secret.
Set a description "Client Secret for Mammouth AI SSO" and expiry (24 months recommended).
Copy the Client secret Value immediately - it won't be shown again!
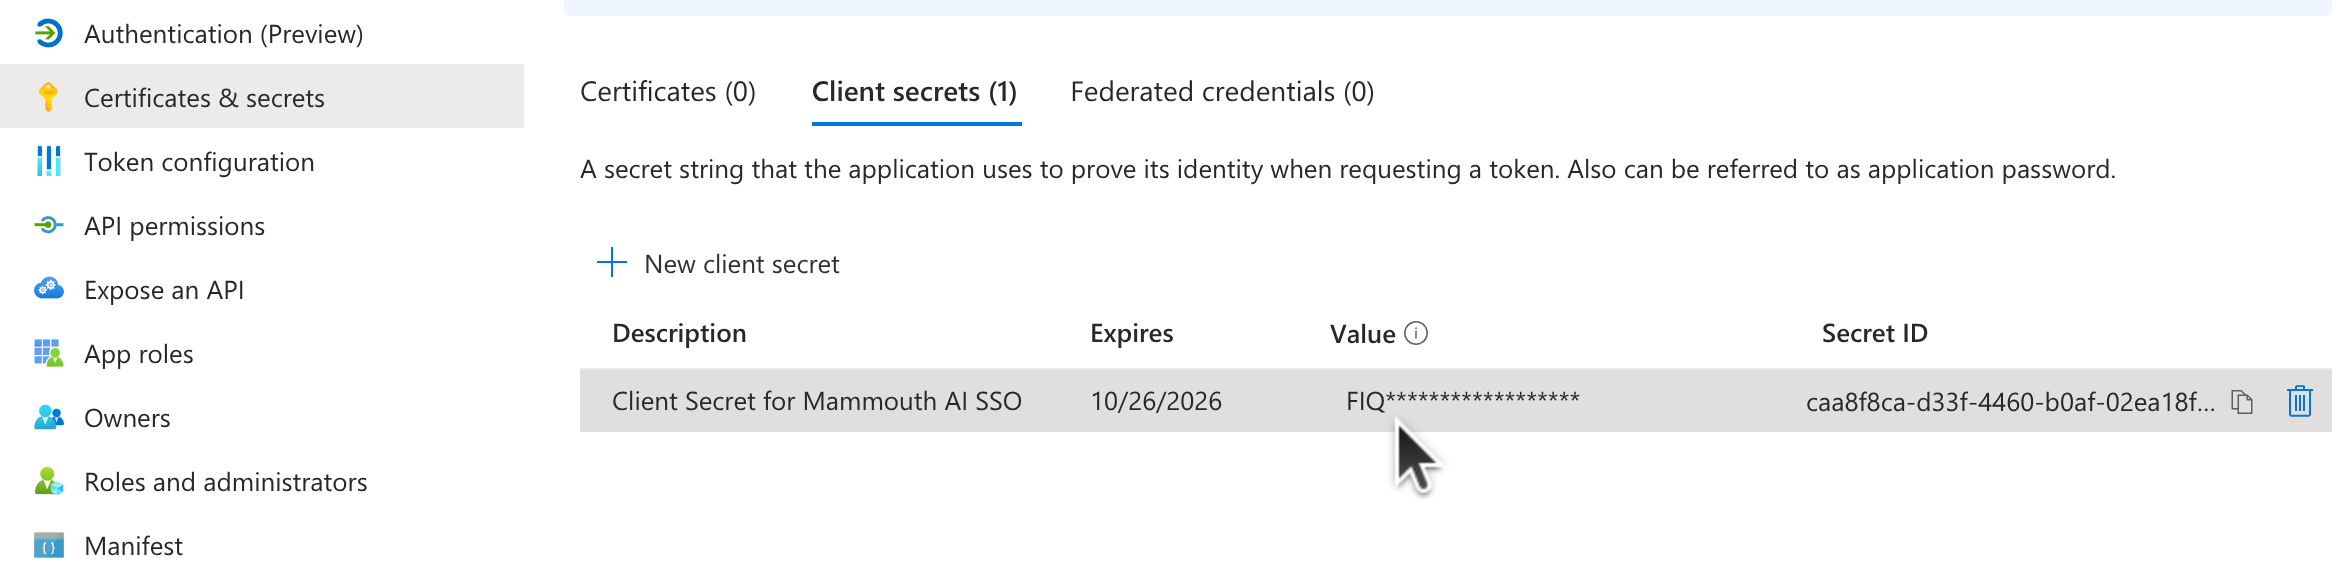
Share this as the Client Secret Value.
What to send to Mammouth (use privatebin.mammouth.ai )
| Field | Where to find it |
|---|---|
| Org. name | Human-readable name for your company, like Acme Corp |
| Alias | The alias derived from your domain, eg acme-com |
| Client ID | App registration → Overview → Application (client) ID |
| Client Secret Value | App registration → Certificates & secrets → Value |
| Entra Tenant ID | App registration → Overview → Directory (tenant) ID |
| Email domain(s) | Your company's email domain(s) |
Okta
1. Create an OIDC application
- Sign in to the Okta Admin Console.
- Go to Applications → Applications → Create App Integration.
- Select OIDC - OpenID Connect and Web Application.
- Fill in:
- App integration name:
Mammouth AI SSO - Grant type: Authorization Code
- Sign-in redirect URI, the alias being a lowercase string without spaces that uniquely identifies your organization (simply respect your DNS, example
google-com):https://sso.mammouth.ai/realms/mammouth/broker/<alias>/endpoint - Sign-out redirect URI:
https://mammouth.ai
- App integration name:
- Under Assignments, assign the app to the relevant groups or users.
- Click Save.
2. Note Client ID and Secret
On the application's General tab, copy:
- Client ID
- Client secret
Also note your Okta domain (e.g. yourcompany.okta.com).
What to send to Mammouth (use privatebin.mammouth.ai )
| Field | Where to find it |
|---|---|
| Org. name | Human-readable name for your company, like Acme Corp |
| Alias | The alias derived from your domain, eg acme-com |
| Client ID | Application → General → Client Credentials |
| Client Secret | Application → General → Client Credentials |
| Okta domain | Your Okta admin URL hostname |
| Email domain(s) | Your company's email domain(s) |
Google Workspace
1. Create an OAuth 2.0 client
- Sign in to Google Cloud Console in your organization's GCP project (or create one).
- Go to APIs & Services → Credentials → Create Credentials → OAuth client ID.
- Select Web application.
- Fill in:
- Name:
Mammouth AI SSO - Authorized redirect URIs: Add:the alias being a lowercase string without spaces that uniquely identifies your organization (simply respect your DNS, example
https://sso.mammouth.ai/realms/mammouth/broker/<alias>/endpointgoogle-com)
- Name:
- Click Create.
2. Note Client ID and Secret
The dialog shows:
- Client ID (ends in
.apps.googleusercontent.com) - Client Secret
3. Configure OAuth consent screen
- Go to APIs & Services → OAuth consent screen.
- Set User type to Internal (so only users in your Workspace org can authenticate).
- Fill in App name, support email, and authorized domain.
- Under Scopes, ensure
openid,email, andprofileare included.
What to send to Mammouth (use privatebin.mammouth.ai )
| Field | Where to find it |
|---|---|
| Org. name | Human-readable name for your company, like Acme Corp |
| Alias | The alias derived from your domain, eg acme-com |
| Client ID | Credentials → OAuth 2.0 Client ID |
| Client Secret | Credentials → OAuth 2.0 Client ID |
| Hosted domain | Your Google Workspace domain (e.g. acme.com) |
| Email domain(s) | Your company's email domain(s) |
Keycloak
Keycloak supports both OIDC and SAML 2.0. We recommend OIDC as it is simpler to configure.
Your Keycloak instance must be reachable from the public internet so that sso.mammouth.ai can complete the authentication flow.
OIDC setup (recommended)
1. Create an OIDC client
- Sign in to your Keycloak Admin Console and select the realm your users belong to.
- Go to Clients → Create client.
- Fill in:
- Client type:
OpenID Connect - Client ID:
mammouth-ai-sso(or any identifier you prefer) - Name:
Mammouth AI SSO
- Client type:
- Click Next and configure capability:
- Client authentication:
On - Standard flow: enabled
- Direct access grants: disabled (not required)
- Client authentication:
- Click Next and set the login settings. The alias is a lowercase string without spaces that uniquely identifies your organization (simply respect your DNS, example
acme-com):- Valid redirect URIs:
https://sso.mammouth.ai/realms/mammouth/broker/<alias>/endpoint
- Valid redirect URIs:
- Click Save.
2. Note the Client ID and Secret
- Client ID: from the client's Settings tab.
- Client Secret: from the client's Credentials tab.
3. Locate your discovery endpoint
Your realm's OIDC discovery endpoint follows this pattern:
https://<your-keycloak-host>/realms/<your-realm>/.well-known/openid-configurationOn older Keycloak versions (< 17), the path includes /auth/:
https://<your-keycloak-host>/auth/realms/<your-realm>/.well-known/openid-configurationThe endpoint must be reachable publicly.
What to send to Mammouth (use privatebin.mammouth.ai )
| Field | Where to find it |
|---|---|
| Org. name | Human-readable name for your company, like Acme Corp |
| Alias | The alias derived from your domain, eg acme-com |
| Discovery endpoint | Your realm's .well-known/openid-configuration URL (must be public) |
| Client ID | Keycloak → Clients → your client → Settings |
| Client Secret | Keycloak → Clients → your client → Credentials |
| Email domain(s) | Your company's email domain(s) |
SAML 2.0 setup
If you prefer SAML, register Mammouth as a Service Provider in your Keycloak realm. The general SP details (Entity ID, ACS URL, metadata) are in the Generic SAML 2.0 section below; the steps here cover the Keycloak-specific configuration that most often trips people up.
1. Create a SAML client
- In your Keycloak Admin Console, select the realm your users belong to.
- Go to Clients → Create client.
- Fill in:
- Client type:
SAML - Client ID:
https://sso.mammouth.ai/realms/mammouth(must match Mammouth's SP Entity ID exactly) - Name:
Mammouth AI SSO
- Client type:
- Click Next, then on the login settings set the alias to a lowercase string without spaces that uniquely identifies your organization (simply respect your DNS, example
acme-com):- Valid redirect URIs and Master SAML Processing URL:
https://sso.mammouth.ai/realms/mammouth/broker/<alias>/endpoint
- Valid redirect URIs and Master SAML Processing URL:
- Click Save.
2. Configure the client settings
In the client's Settings tab, set:
- Name ID format:
email - Force Name ID format:
On - Client signature required:
Off— unless you upload Mammouth's SP certificate (see troubleshooting below).
3. Verify attribute mappings
Go to Client Scopes → <your-client>-dedicated → Mappers and ensure mappers exist that emit at minimum the email attribute, plus optionally firstName/lastName, matching the names in the Required attribute mappings table.
Troubleshooting
We're sorry... invalid requester on login — this almost always means a signature or Name ID mismatch. Check, in order:
- Force Name ID format is enabled and set to
email. - Either disable Client signature required, or import Mammouth's SP certificate under Clients → your client → Keys → Import → Certificate PEM. Some Keycloak versions have a broken certificate import in the default admin theme — if the import appears to succeed but signature validation still fails, switch Realm Settings → Themes → Admin Theme to
keycloak.v2and re-import. - Client scope mappings emit the expected attributes.
What to send to Mammouth (use privatebin.mammouth.ai )
| Field | Where to find it |
|---|---|
| Org. name | Human-readable name for your company, like Acme Corp |
| Alias | The alias derived from your domain, eg acme-com |
| IdP Metadata URL | Keycloak realm SAML descriptor URL (must be publicly reachable), or the XML file |
| Email domain(s) | Your company's email domain(s) |
Generic SAML 2.0
Keycloak acts as the SAML Service Provider (SP). Your IdP needs to trust this SP.
SP metadata URL
Provide this URL to your IdP:
https://sso.mammouth.ai/realms/mammouth/broker/<alias>/endpoint/descriptorthe alias being a lowercase string without spaces that uniquely identifies your organization (simply respect your DNS, example google-com)
This returns the SP metadata XML including the Entity ID, ACS URL, and signing certificate.
SP Entity ID (Issuer)
https://sso.mammouth.ai/realms/mammouthACS (Assertion Consumer Service) URL
https://sso.mammouth.ai/realms/mammouth/broker/<alias>/endpointRequired attribute mappings
Your IdP must send the following attributes in the SAML assertion:
| SAML Attribute | Description | Example value |
|---|---|---|
email or urn:oid:0.9.2342.19200300.100.1.3 | User's email address | [email protected] |
firstName or givenName | (Optional) First name | Alice |
lastName or sn | (Optional) Last name | Smith |
What to send to Mammouth (use privatebin.mammouth.ai )
| Field | Where to find it |
|---|---|
| IdP Metadata URL | Your IdP's SAML metadata URL, or the metadata XML file |
| Email domain(s) | Your company's email domain(s) |
| Attribute name for email | The SAML attribute name used for the email claim |